Missions Web Component
 Deprecated. Web components have been deprecated and replaced with Nitro Impact. While still supported, no updates or fixes are expected for web components.
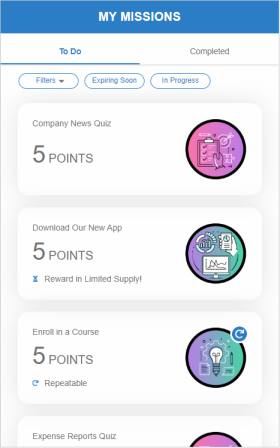
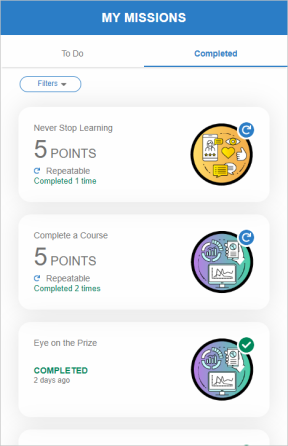
Displays the missions a user is eligible to complete and missions they've already completed. Users can filter the list by missions that are Expiring Soon, In Progress, or have a label applied to them. Missions display based on their featured status and importance.
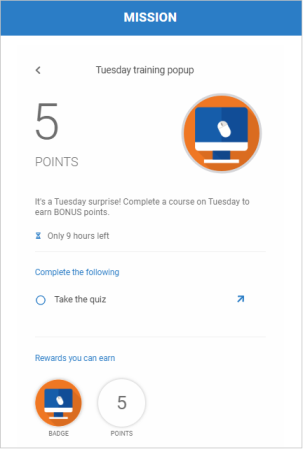
From the list view, you can open a detail view showing more of the mission's information. If a mission has a limited reward, users will see that the reward is in limited supply and when that reward is out of stock. By default, any reward limited by number of points will immediately display in the web component while rewards limited by time will display when the expiration date is 7 days from the current date. Rewards will show in the top section of the web component in the following order 1) limited award points, 2) limited non-award points, 3) unlimited award points, then 4) unlimited non-award points. All awards will show in the Rewards you can earn section.
You can add a call to action by adding a URL to the mission rule(s) which link each task to the location where it is completed (rule URL field). In Bunchball Go, the web component logs the HUB_CLICK_THROUGH action when a user clicks a linked task. This action must exist in your program to allow the web component to behave as expected.
|
|
|
|
|
|
List view To Do tab |
List view Completed tab |
Detail view with expiration |
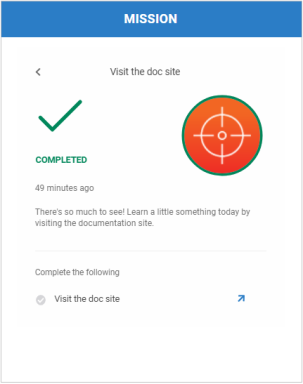
Detail of a completed mission |
Configure a Web Component
- Open Nitro Studio > Integrate > Web Components.
- Click New > Missions.
- Enter the web component settings.
Parameters are used when working directly with a web component embed tag (HTML) or editing the config.json file for Bunchball Go. - web component - set the component tag as bunchball-missions.
- iframe - must match exactly with the name of the web component created in Nitro Studio.
- web component - Recommended. Web components improve performance due to faster loading. Height and width settings are not required as the web component will fill space on the page like any other HTML element.
- iframe - The source code is a div tag and the rendered web component will be inside an iframe.
- none - Do not show locked missions.
- all - Show all locked missions.
- prereq - Show missions that are locked because they have a mission or level prerequisite that must be met before the mission is available. Note: Missions that are locked due to a level prerequisite will show in the web component when the user is one level away from unlocking the mission.
- startTime - Show missions that are locked because they are due to start in the near future (default is 5 days).
|
Studio Field |
Description |
Parameters |
||||
|---|---|---|---|---|---|---|
|
Web Component Embed HTML |
Bunchball Go config.json |
Valid Values |
Required (web component) |
Required (iframe) |
||
|
Name |
The web component name. |
name |
name |
|
No |
Yes |
|
Width |
The web component's width. |
width |
width |
|
No |
Yes |
|
Height |
The web component's height. |
height |
height |
|
No |
Yes |
|
Custom Styles |
The link to your custom stylesheet(s). Accepts a comma delimited list of URLs. |
|
|
|
|
|
|
Embed Type |
Specifies the type of embed code to generate. |
data-embed-type |
embed-type |
iframe |
No |
Yes |
|
Web Component Settings |
||||||
|
Title |
The header title to display on the main view (list view). Defaults to Missions. |
data-title |
title |
|
No |
No |
|
Detail Title |
The header title to display on the detail view. Defaults to Missions. |
data-detail-title |
detail-title |
|
No |
No |
|
Subtitle |
The subtitle to display below the web component header. |
data-subtitle |
subtitle |
|
No |
No |
|
User ID |
The ID of the user to get missions for. |
data-user-id |
user-id |
|
Yes |
Yes |
|
Link Navigation Type |
Specifies if the task links in the detail view should open inline or in a new tab. Defaults to inline. Note: When you choose to open the mission in a new tab, users will need to allow pop-ups for the site. |
data-navigation |
navigation |
inline, new tab |
No |
No |
|
Filter Settings |
||||||
|
Label Name |
Filters missions by the specified label. If no label is selected, all missions are shown. |
data-label |
label |
|
No |
No |
|
Hide Expiring Soon Filter |
If true, hides the Expiring Soon filter. |
data-hide-filter-expiring |
hide-filter-expiring |
true, false |
No |
No |
|
Hide In Progress Filter |
If true, hides the In Progress filter. |
data-hide-filter-inprogress |
hide-filter-inprogress |
true, false |
No |
No |
|
Hide Labels Filter |
If true, hides the labels filter. Users will not be able to filter based on your site's labels. |
data-hide-filter-labels |
hide-filter-labels |
true, false |
No |
No |
|
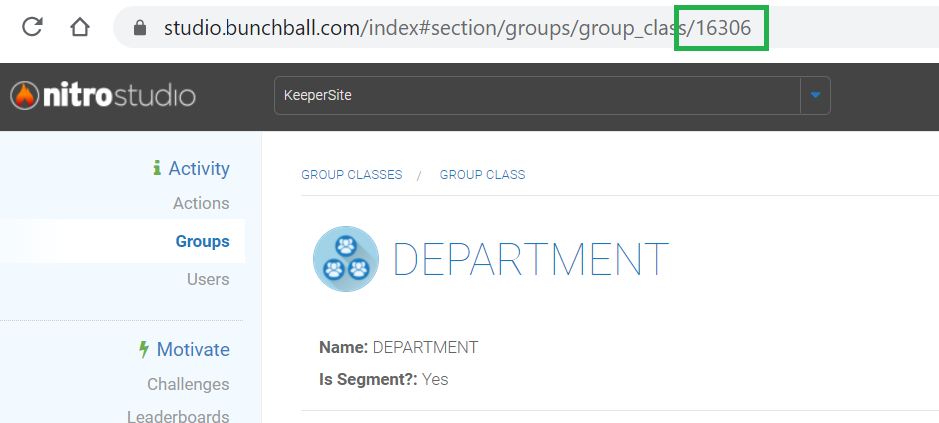
Group Class IDs |
Specifies which group class(es) to show missions for. When a group class is set, the web component displays a settings button to allow the user to toggle between user and group missions. Click the image to see where to find a group class ID.
|
data-group-ids |
group-ids |
|
No |
No |
|
Content Settings |
||||||
|
Mission ID |
Specifies a single mission to show in the web component. The mission will load directly in the detail view. |
data-mission-id |
mission-id |
|
No |
No |
|
Show Forced Label Filter |
If true, the label set in the Label Name field will show in the filter bar. If false, the label will be hidden. |
data-show-forced-label-filter |
show-forced-label-filter |
true, false |
No |
No |
|
Return Count |
The number of missions to display in the main view (list view). The web component supports up to 100 missions. Defaults to 10. |
data-return-count |
return-count |
|
No |
No |
|
Show Locked Missions |
Specifies whether locked missions show in the web component. |
data-show-locked |
show-locked |
all, none, prereq, startTime |
No |
No |
|
Mission URL Text |
The text to display when a mission URL is set. Defaults to "Do The Mission". |
data-challenge-url-text |
challenge-url-text |
|
No |
No |
|
Show Eligible Missions |
Specifies whether eligible missions show in the web component. If both eligible and completed missions are shown, missions of each type display on separate tabs. |
data-show-eligible-missions |
show-eligible-missions |
true, false |
No |
No |
|
Show Completed Missions |
Specifies whether completed missions show in the web component. If both eligible and completed missions are shown, missions of each type display on separate tabs. |
data-show-completed-missions |
show-completed-missions |
true, false |
No |
No |
|
Custom name for the Eligible Missions tab |
The name to display for the eligible missions tab. Defaults to To Do. |
data-show-eligible-missions-tab-name |
show-eligible-missions-tab-name |
|
No |
No |
|
Custom name for the Completed Missions tab |
The name to display for the completed missions tab. Defaults to Completed. |
data-completed-missions-tab-name |
completed-missions-tab-name |
|
No |
No |
|
Show Data as Duration |
Specifies whether to show the date as a duration (e.g. 3 days ago), then as a set date after a week (March 10, 2022). If false, the set date always displays. |
data-show-date-as-duration |
show-date-as-duration |
true, false |
No |
No |
|
Language |
Add a language code to preview the web component in a Nitro supported default language. Default languages are: en, de, hi, zh, it, es, and fr. |
|
|
|
No |
No |
|
Custom Language Reference |
Add a language code and then add a custom translation key to the browser console to preview the web component in a non-default language. |
|
|
|
No |
No |
|
|
Specifies if a HUB_CLICK_THROUGH action should be logged when a user clicks a link in the detail view task list. |
data-log-click-through |
log-click-through |
true, false |
No |
No |
- Click Save & Finish and reopen the web component.
- Click Get Web Component Embed Code. Copy the code to the clipboard or a file.
- Include the code to generate an OAuth token in your app.
- Insert the embed code into the page/div where you want to display the web component in your app or web page, and update the variable for the OAuth token.
- If necessary, set up the web component to allow you to link to a specific mission from an external source.
Sample Embed Code
See Embed an OAuth Web Component for more information and the Web Components view for the most up-to-date embed code. The following is an example embed for a Missions web component.
|
web component |
iframe |
|---|---|
|
Copy
|
Copy
|
See also