Localization
Nitro's built-in language support allows blocks and APIs to work in collaboration with user-facing content translations to achieve a translated program. Show me a diagram of the localization process![]()
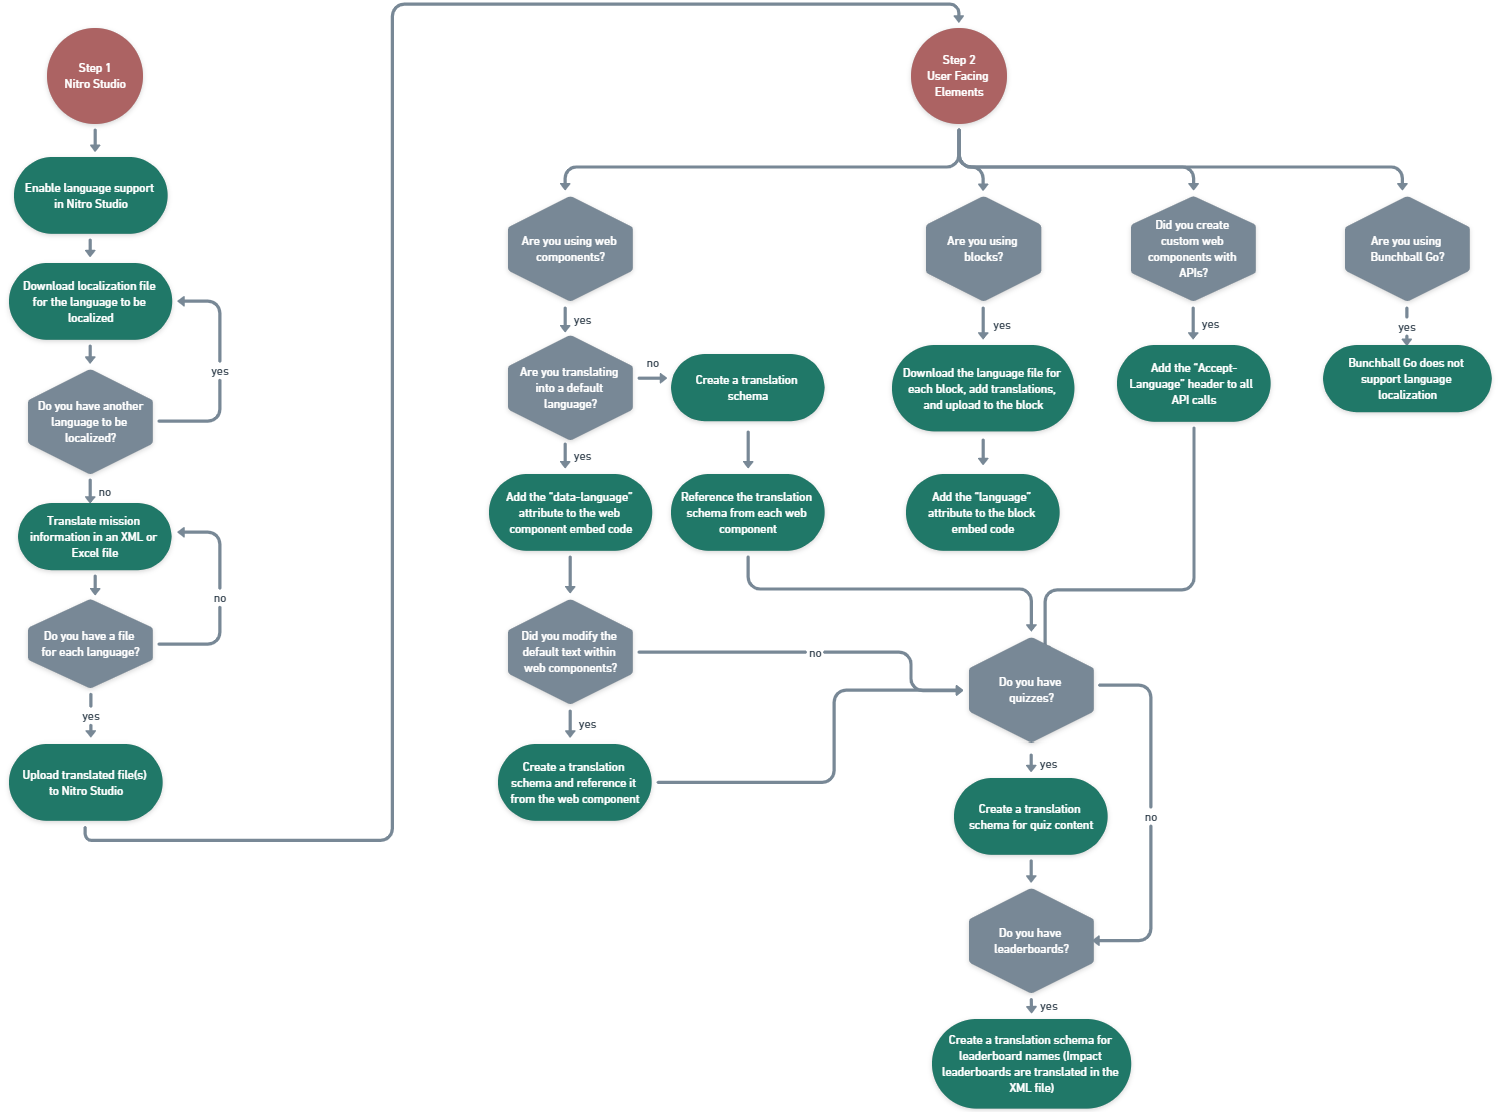
To translate your program, you will need to:
-
Enable localization. Show me supported locales

|
Bulgarian (bg-BG) |
English - Great Britain (en-GB) |
Georgian (ka-GE) |
Italian - Switzerland (it-CH) |
Portuguese - Portugal (pt-PT) |
Swedish (sv-SE) |
|
Chinese (zh-CN) |
English - India (en-IN) |
German (de-DE) |
Japanese (ja-JP) |
Romanian (ro-RO) |
Taiwanese (zh-TW) |
|
Chinese Traditional (zh-HK) |
English - United States (en-US) |
German - Austria (de-AT) |
Kazakhstan (kk-KZ) |
Russian (ru-RU) |
Thai (th-TH) |
|
Czech (cs-CZ) |
Finnish (fi-FI) |
German - Switzerland (de-CH) |
Korean (ko-KR) |
Slovak (sk-SK) |
Turkish (tr-TR) |
|
Danish (da-DK) |
French (fr-FR) |
Greek (el-GR) |
Lithuanian (lt-lt) |
Slovenian (sl-SI) |
|
|
Dutch - Belgium (nl-BE) |
French - Belgium (fr-BE) |
Hebrew (he-IL) |
Malay (ms-MY) |
Spanish - Argentina (es-AR) |
|
|
Dutch - Netherlands (nl-NL) |
French - Canada (fr-CA) |
Hungarian (hu-HU) |
Norwegian (nb-NO) |
Spanish - Colombia (es-CO) |
|
|
English - Australia (en-AU) |
French - Morocco (fr-MA) |
Indonesian (id-ID) |
Poland (pl-PL) |
Spanish - Mexico (es-MX) | |
|
English - Canada (en-CA) |
French - Switzerland (fr-CH) |
Italian (it-IT) |
Portuguese - Brazil (pt-BR) |
Spanish - Spain (es-ES) |
-
Translate your program content such as missions, levels, and recognitions.
-
Translate your front-end UI. This front-end may be blocks or a custom program created with APIs.
Note: When testing a localized program, you may need to verify in a Production environment as Sandbox does not show all characters correctly.
Enable Locales and Translate Program Content
Each locale you choose to support has its own translation file, in JSON format, which is managed in Nitro Studio. This file translates your mission information, levels, exchanges, and other program content. Show details![]()
- Open Nitro Studio > Configuration > Localization.
- In the Locales list, click the Enable Locale button (
 ) for a locale your program supports.
 - Under Enabled Locales, click the Download Localization File button (
 ) for the enabled language.
 When downloading translatable data, you must download from the instance you want to localize. You cannot download from your Sandbox instance and try to upload it to Production. Although the content may be the same between instances, the reference IDs are different.
- In the translation file, update the translatedValue field for every value you want to localize and save the file. The file elements are:
baseValue - the English text
entity - the element type such as challenge, level, leaderboard, etc.
field - the field you're localizing such as name, display name, action phrase, etc.
refId - the Id that maps to the mission/level/etc.
translatedValue - the localized text
- When you've finished translating your content, return to the Nitro Studio Localization page, add the file in the Translation Upload section, and then click Upload.
Note: If you receive an error when uploading a translation file, make sure the file size is less than 1MB. If you have a large number of missions, you may need to split your data into multiple files for upload.
-
Repeat steps 2-5 for each language your program supports.
If you upload a translation file and then download via the same browser, the file may not contain all translations until you refresh the cache.
As your program grows, you will need to repeat steps 3-5 to translate new content.
Translate User Facing Elements
Blocks
Complete the following to translate your program. Note: Impact can be used globally but does not support localization of quizzes.
See Translation Keys for the steps needed to update your localized blocks when new features are added to Nitro.
Step 1: Translate blocks. Show details![]()
Each block requires its own translation file which is managed in Nitro Studio. JSON is the only supported file type for blocks.
-
Open Integrate > Blocks > click the block you want to localize.
-
Click the Languages drawer and then click Download.
-
Update the localization file to include all language codes and translations for each language in your program.
-
Upload the updated localization file to the Languages drawer and click Save.
The languages in your file will display in the drawer. Click a language in the list to preview the translations.
Step 2: Modify each block's embed code. Show details![]()
Add the "language" attribute and the language code to the block embed code in the src URL.
The "language" attribute accepts one or multiple values (e.g. language=es-MX,es-ES). If you have multiple languages, use a token that can be replaced at runtime with the user's language code.
<div style="width: 100dvw; height: 100dvh">
    <iframe title="Impact"
    allow="clipboard-write"
    style="border: none; width: 100%; height: 100%"
    src="https://blocks.bunchball.com/embeds/impact/407481ac-4dca-xxxx-651154f697b1?token=d89e8axxxx318fee9d4x87b74e9d29&language=es-MX"></iframe>
</div>
Impact+
Complete the following to translate your program. Note: Impact+ can be used globally but does not support localization of quizzes.
See Translation Keys for the steps needed to update your localized blocks when new features are added to Nitro.
Step 1: Translate all blocks. Show details![]()
Each block requires its own translation file which is managed in Nitro Studio. JSON is the only supported file type for blocks.
-
Open Integrate > Blocks > click the Impact block you want to localize.
-
Click the Languages drawer and then click Download.
-
Update the localization file to include all language codes and translations for each language in your program.
-
Upload the updated localization file to the Languages drawer and click Save.
The languages in your file will display in the drawer. Click a language in the list to preview the translations.
-
If your program includes recognitions, repeat steps 1-4 for the Recognitions block.
-
Open Integrate > Impact+ and repeat steps 2-4 for the Impact+ block.
Step 2: Translate the Impact+ site Show details![]()
-
In the Impact+ Languages drawer, select Display region if you want to show the language and region in the user's language selection list.
-
When a user logs in to Impact+, they will be prompted to select a language. The language selection list includes the languages enabled in the Localization view. If the site has only one language enabled, the language selection list is hidden.
-
The user's selected language is stored as a preference and Impact+ will read the preference and translate the site when the user logs in.
You can also set a user's language preference in the Users view or by uploading via data import.
Once a language is selected, the language selection list is hidden from the header. Users can change their language from the icon in the footer.
Custom Programs
When translating a custom program created using APIs, you can use Nitro APIs to return the localized data you uploaded to Nitro Studio for mission, levels, etc. Then, UI elements will require additional translation with your custom build.
Step 1: Translate custom elements created using APIs. Show details![]()
-
Use the Localization view in Nitro Studio to find your language code. Use a 2-digit code to translate into the base language and a 4-digit code to translate into the locale.
-
Add the "Accept-Language" header and language code to all your API calls.
The header is required on every API call as each is a single transaction and there is no session data.
Step 2: Translate quizzes. Show details![]()
Quiz content (quiz name, questions, and answers) is translated as flat text.
Translation overrides are EXACT matches on the quiz content including the quiz title and description, question text, and answer text. Matches are case-sensitive.
-
Create a translation schema containing your quizzes, their questions, and their answers (or add quizzes to your existing translation schema). No quiz, question, or answer IDs are needed.
-
If you're translating into multiple languages, add a custom override for each language your program supports.
-
Add the "data-translation-reference" attribute to reference your translation schema.
<script>
  window.BunchballTranslations = {
    es: {
      translation: {
        // quiz 1
        "Space": "Espacio",
        "The space quiz": "la prueba del espacio",

        "Is Pluto a planet?": "¿Plutón es un planeta?",
          "no": "no",
          "yes": "sí",

        "Why do the moon and sun look bigger on the horizon?": "¿La atmósfera de la Tierra es una lupa?",
          "Earth's atmosphere is a magnifying glass": "La atmósfera de la Tierra es una lupa",
          "We have tears in our eyes watching them": "Tenemos lágrimas en los ojos mirándolos",
          "Earth's gravity bends light so we 'see' them before seeing them": "La gravedad de la Tierra dobla la luz para que los 'veamos' antes de verlos",

        "What is Ceres?": "¿Qué es Ceres?",
          "Dwarf planet": "Planeta enano",
          "Asteroid": "Asteroide",
          "Constellation": "Constelación"
      }
    }
  }
</script>
Translation Keys
Each block has its own translation key containing all the strings required for a complete translation of that block. Do not translate tokens such as "{{balance}}".
As new features are added to a block, you must update your translation file to include the new strings. Nitro does not automatically merge new strings into your existing translation file. Show details![]()
-
Open Integrate > Blocks > click the block you want to update.
-
Click the Languages drawer and then click Download. This downloads the block's current translation file.
-
Return to the Blocks list view, click New, and select the block type you need to update.
- Click the Languages drawer and then click Download. This downloads the default translation key.
You can close the new block without saving. - Compare your current translation file (from step 2) with the default translation file (from step 4) to find new strings that need to be translated.
- Translate any new strings and then merge the new strings into your current translation file (from step 2).
- Upload the new localization file to your block using the Languages drawer.
Show me an example translation key![]()
{
   "en-US": {
      "form-amount-col": "Amount ({{minValue}}-{{maxValue}})",
      "form-amount-total": "Total expense: {{totalExpense}}",
      "form-balance": "Your new balance: {{balance}}",
      "form-balance-low-error": "Balance is too low",
      "form-category-select-label": "Category",
      "form-confirm-amount-total": "Total expense",
      "form-confirm-amounts-label": "Amount",
      "form-confirm-balance": "Your new balance",
      "form-confirm-category-label": "Category",
      "form-confirm-message-label": "Message",
      "form-confirm-recips-label": "Recipient",
      "form-confirm-title": "Confirmation",
      "form-confirm-warn": "Please review before sending! Once sent, it cannot be undone.",
      "form-exchange-label": "Program",
      "form-exchange-select-label": "Select Program",
      "form-invalid-amount-error": "Enter a valid amount",
      "form-invalid-comment-error": "Comment is required",
      "form-invalid-recipients-error": "Recipients are required",
      "form-message-label": "Message",
      "form-next-button": "Next",
      "form-recips-label": "Recipient",
      "form-recips-select-label": "Recipients",
      "form-same-amounts-checkbox": "Same amount for recipients",
      "form-sent-again-link": "Send another",
      "form-sent-button": "Done",
      "form-sent-label": "Sent!",
      "form-submit-button": "Submit",
      "header-send-rec-button": "Send a recognition",
      "header-title": "Recognition",
      "navigation-previous-page": "Back",
      "rcvd-detail-amount": "Amount:  ()",
      "rcvd-detail-category-label": "Category: ",
      "rcvd-detail-date": "Received: {{date}}",
      "rcvd-detail-message-label": "Message",
      "rcvd-detail-sender-label": "You received from",
      "rcvd-tab-blank-msg": "You haven't received a recognition",
      "rcvd-tab-label": "Received",
      "sent-detail-amount": "Amount: ",
      "sent-detail-amounts-label": "Amount",
      "sent-detail-category-label": "Category: ",
      "sent-detail-date": "Sent: {{date}} ",
      "sent-detail-message-label": "Message",
      "sent-detail-recips-header": "You sent to",
      "sent-detail-recips-label": "Recipient",
      "sent-tab-blank-msg": "You haven't given a recognition",
      "sent-tab-details-link": "Show details",
      "sent-tab-label": "Sent",
      "sent-tab-mltpl-recips-link": "more"
   }
}{
"fr-FR": {
"form-amount-col": "Montant ({{minValue}}-{{maxValue}})",
"form-amount-total": "Dépense totale: {{totalExpense}}",
"form-balance": "Votre nouveau solde: {{balance}}",
"form-balance-low-error": "Le solde est trop faible",
"form-category-select-label": "Catégorie",
"form-confirm-amount-total": "Dépense totale",
"form-confirm-amounts-label": "Montant",
"form-confirm-balance": "Votre nouveau solde",
"form-confirm-category-label": "Catégorie",
"form-confirm-message-label": "Message",
"form-confirm-recips-label": "Destinataire",
"form-confirm-title": "Confirmation",
"form-confirm-warn": "Veuillez vérifier avant d'envoyer! Une fois envoyé, il ne peut être annulé.",
"form-exchange-label": "Programme",
"form-exchange-select-label": "Sélectionnez le programme",
"form-invalid-amount-error": "Entrez un montant valide",
"form-invalid-comment-error": "Un commentaire est requis",
"form-invalid-recipients-error": "Les destinataires sont requis",
"form-message-label": "Message",
"form-next-button": "Suivant",
"form-recips-label": "Destinataire",
"form-recips-select-label": "Destinataires",
"form-same-amounts-checkbox": "Même montant pour les bénéficiaires",
"form-sent-again-link": "Envoie un autre",
"form-sent-button": "Fait",
"form-sent-label": "Envoyé!",
"form-submit-button": "Soumettre",
"header-send-rec-button": "Envoyer une reconnaissance",
"header-title": "Reconnaissance",
"navigation-previous-page": "Dos",
"rcvd-detail-amount": "Montant: ()",
"rcvd-detail-category-label": "Catégorie: ",
"rcvd-detail-date": "Reçu: {{date}}",
"rcvd-detail-message-label": "Message",
"rcvd-detail-sender-label": "Vous avez reçu de",
"rcvd-tab-blank-msg": "Vous n'avez pas reçu de reconnaissance",
"rcvd-tab-label": "Reçu",
"sent-detail-amount": "Montant: ",
"sent-detail-amounts-label": "Montant",
"sent-detail-category-label": "Catégorie: ",
"sent-detail-date": "Envoyé: {{date}} ",
"sent-detail-message-label": "Message",
"sent-detail-recips-header": "Vous avez envoyé à",
"sent-detail-recips-label": "Destinataire",
"sent-tab-blank-msg": "Vous n'avez pas donné de reconnaissance",
"sent-tab-details-link": "Afficher les détails",
"sent-tab-label": "Envoyé",
"sent-tab-mltpl-recips-link": "plus"
},
"en-US": {
"form-amount-col": "Amount ({{minValue}}-{{maxValue}})",
"form-amount-total": "Total expense: {{totalExpense}}",
"form-balance": "Your new balance: {{balance}}",
"form-balance-low-error": "Balance is too low",
"form-category-select-label": "Category",
"form-confirm-amount-total": "Total expense",
"form-confirm-amounts-label": "Amount",
"form-confirm-balance": "Your new balance",
"form-confirm-category-label": "Category",
"form-confirm-message-label": "Message",
"form-confirm-recips-label": "Recipient",
"form-confirm-title": "Confirmation",
"form-confirm-warn": "Please review before sending! Once sent, it cannot be undone.",
"form-exchange-label": "Program",
"form-exchange-select-label": "Select Program",
"form-invalid-amount-error": "Enter a valid amount",
"form-invalid-comment-error": "Comment is required",
"form-invalid-recipients-error": "Recipients are required",
"form-message-label": "Message",
"form-next-button": "Next",
"form-recips-label": "Recipient",
"form-recips-select-label": "Recipients",
"form-same-amounts-checkbox": "Same amount for recipients",
"form-sent-again-link": "Send another",
"form-sent-button": "Done",
"form-sent-label": "Sent!",
"form-submit-button": "Submit",
"header-send-rec-button": "Send a recognition",
"header-title": "Recognition",
"navigation-previous-page": "Back",
"rcvd-detail-amount": "Amount: ()",
"rcvd-detail-category-label": "Category: ",
"rcvd-detail-date": "Received: {{date}}",
"rcvd-detail-message-label": "Message",
"rcvd-detail-sender-label": "You received from",
"rcvd-tab-blank-msg": "You haven't received a recognition",
"rcvd-tab-label": "Received",
"sent-detail-amount": "Amount: ",
"sent-detail-amounts-label": "Amount",
"sent-detail-category-label": "Category: ",
"sent-detail-date": "Sent: {{date}} ",
"sent-detail-message-label": "Message",
"sent-detail-recips-header": "You sent to",
"sent-detail-recips-label": "Recipient",
"sent-tab-blank-msg": "You haven't given a recognition",
"sent-tab-details-link": "Show details",
"sent-tab-label": "Sent",
"sent-tab-mltpl-recips-link": "more"
},
"es-MX": {
"form-amount-col": "Cantidad ({{minValue}}-{{maxValue}})",
"form-amount-total": "Gasto total: {{totalExpense}}",
"form-balance": "Tu nuevo saldo: {{balance}}",
"form-balance-low-error": "El saldo es demasiado bajo",
"form-category-select-label": "Categoría",
"form-confirm-amount-total": "Gasto total",
"form-confirm-amounts-label": "Cantidad",
"form-confirm-balance": "Tu nuevo saldo",
"form-confirm-category-label": "Categoría",
"form-confirm-message-label": "Mensaje",
"form-confirm-recips-label": "Destinataria",
"form-confirm-title": "Confirmación",
"form-confirm-warn": "¡Por favor revise antes de enviar! Una vez enviado, no se puede deshacer.",
"form-exchange-label": "Programa",
"form-exchange-select-label": "Seleccionar programa",
"form-invalid-amount-error": "Introduce un importe válido",
"form-invalid-comment-error": "Se requiere comentario",
"form-invalid-recipients-error": "Se requieren destinatarias",
"form-message-label": "Mensaje",
"form-next-button": "Próxima",
"form-recips-label": "Destinataria",
"form-recips-select-label": "Destinatarias",
"form-same-amounts-checkbox": "Misma cantidad para los destinatarios",
"form-sent-again-link": "Envie otro",
"form-sent-button": "Hecho",
"form-sent-label": "¡Enviada!",
"form-submit-button": "Entregar",
"header-send-rec-button": "Enviar un reconocimiento",
"header-title": "Reconocimiento",
"navigation-previous-page": "Atrás",
"rcvd-detail-amount": "Cantidad: ()",
"rcvd-detail-category-label": "Categoría: ",
"rcvd-detail-date": "Recibida: {{date}}",
"rcvd-detail-message-label": "Mensaje",
"rcvd-detail-sender-label": "recibiste de",
"rcvd-tab-blank-msg": "No has recibido un reconocimiento",
"rcvd-tab-label": "Recibida",
"sent-detail-amount": "Cantidad: ",
"sent-detail-amounts-label": "Cantidad",
"sent-detail-category-label": "Categoría: ",
"sent-detail-date": "Enviada: {{date}} ",
"sent-detail-message-label": "Mensaje",
"sent-detail-recips-header": "enviaste a",
"sent-detail-recips-label": "Destinataria",
"sent-tab-blank-msg": "No has dado un reconocimiento",
"sent-tab-details-link": "Mostrar detalles",
"sent-tab-label": "Enviada",
"sent-tab-mltpl-recips-link": "más"
}
}See also