Impact+ Configuration
Configuration options for Impact+ include the elements users see in the site's header and footer. All other configuration options and program content are pulled from the Impact block, Recognitions block, and theme.
Placement of logos, links, and blocks is pre-configured as part of the Impact+ site and cannot be changed.
Impact+ Program Setup
The following are the basic steps the account team will follow to create and launch an Impact+ site. In parallel, the team will finalize your program strategy and create levels, missions, and other program elements.
-
Determine if your program will use the Lite (basic customization) or Essentials (full customization) version of the login screen.
-
If using SSO, gather the information required for configuration and complete the setup.
-
Create the Impact+ site and theme.
-
Load users and create their auth mappings.
-
Test and launch the program.
Configure the Impact+ Block
Use the Impact+ Builder to manage your site's header and footer.
Note: Blocks are not functional in the Impact+ builder. You will see an invalid block ID error if you try to use the Impact or Recognitions blocks.
-
Open Nitro Studio > Integrate > Impact+.
-
Use the header bar to edit the block's name. The name does not need to be unique.
-
Use the Settings > Blocks drawer to define the Impact and Recognitions blocks .
.
|
Impact
|
Select the Impact block to use on the site.
|
|
Display Recognitions
|
Select if your program includes the Recognitions block.
|
|
Recognitions Link text
|
The title to display on the recognitions button in the header. Defaults to Recognition.
|
|
Recognitions Block
|
Select the Recognitions block to use on the site.
|
-
Use the Settings > Header drawer to manage the logos and links in the site's header.
|
Brand logo
|
The first image to appear in the header.
|
|
Program logo
|
The second image to appear in the header. If your header only has one logo, use the Brand logo field.
|
|
Header links
|
The header's static content links. The ideal length of the text to display depends on the number of links you add.
- Click Add Link.
- In the Tex to display field, enter the link name.
- In the URL field, enter the link URL.
- Click Save.
- Repeat steps 1-4 to add all links.
- If necessary, drag and drop the tiles into the order you want them to appear in the header.
|
-
Use the Settings > Footer drawer to manage the logos and links in the site's footer.
|
Footer links
|
The footer's static content links. The ideal length of the text to display depends on the number of links you add.
- Click Add Link.
- In the Tex to display field, enter the link name.
- In the URL field, enter the link URL.
- Click Save.
- Repeat steps 1-4 to add all links.
- If necessary, drag and drop the tiles into the order you want them to appear in the footer.
|
|
Privacy notice
|
The privacy notice in PDF format.
|
|
Brand logo
|
The first image to appear in the footer.
|
|
Program logo
|
The second image to appear in the footer. If your footer only has one logo, use the Brand logo field.
|
|
Trademark
|
The trademark text.
|
- Use the Languages drawer to customize or localize the text
 in the header and footer.
|
Display region
|
Select to display the region and language in the Impact+ languages list. The list is populated with values enabled in the Localization view.
|
|
Download
|
Downloads a language file containing the site's text keys and values.
- If no language file has been uploaded, a file containing the default keys will be downloaded.
- If a language file has already been uploaded, that file will be downloaded.
|
|
localization.json
|
The language file used to customize the text in English or localize into a supported language.
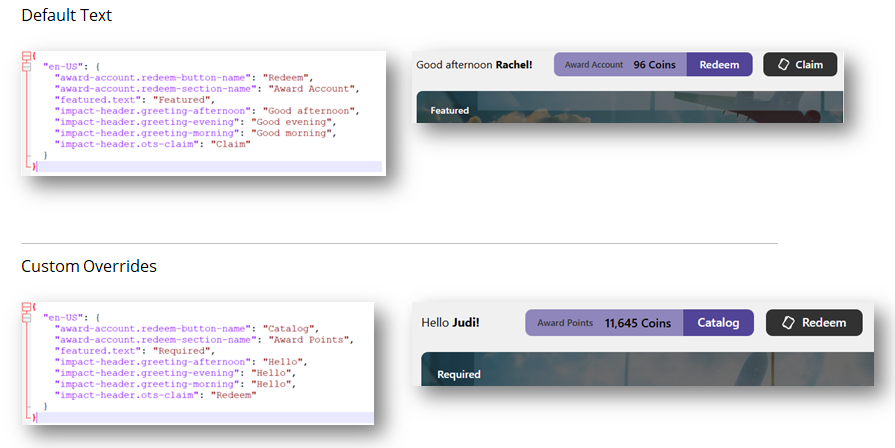
- To customize any text string, download the language file, edit the values for your custom text, then upload the new file and save. Show me an example


- To localize into another language, see Localization and follow the steps outlined there. After uploading a localization file, you can preview the changes in another language by selecting a locale in the list.
|
- Click Save (
 ).
).
 If you're editing an existing site, changes are pushed immediately and reflected in the preview.
See also
Impact+
Impact+ registration
 .
. in the site's header.
 in the site's footer.
 in the header and footer.
  ).
).  If you're editing an existing site, changes are pushed immediately and reflected in the preview.