Salesforce Integration
Note: New partner integrations must be authorized by Bunchball. Contact Bunchball Support for more information.
Integrating Bunchball with Salesforce enables you to use Nitro's web components in the Visualforce UI. The placement of UI components within Visualforce is highly configurable.
Action Integration
There are a number of options for integrating your Salesforce activities (actions) into Nitro. The solution can entail using Salesforce Workflow Rules, Salesforce Apex triggers, and/or flat file batch integration options. The Bunchball Technical Services team will work with you to ensure the best solution is in place. Show me more details
Web Component Integration
The Bunchball - Salesforce integration requires the following configuration steps:
- Install the integration package. Package contents are listed here.
- Configure the API key, OAuth, and other general settings.
- Configure web components in the appropriate Salesforce pages.
- Configure access to Visualforce pages.
Install the Integration Package
Contact Bunchball Support for a link to the installation package. Use the link to install the package in your Salesforce environment. After installation, configure the integration as detailed in the following sections.
Add the Bunchball API Key to Salesforce
- In Salesforce, navigate to click Setup > Build > Develop > Custom Settings.
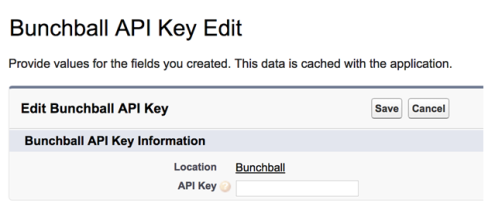
- Click the Manage link for the Bunchball API Key.
- Add the API key from Nitro Studio (Configuration > Site Settings > Overview tab).
Note: The API key may vary within development, test, staging, and production environments.

Configure OAuth
- In Nitro Studio, configure your web components and their associated OAuth security.
- In Salesforce, navigate to Setup > Build > Develop > Custom Settings.
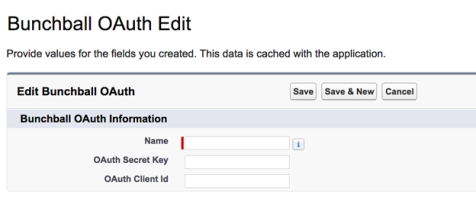
- Click the Manage link for > Bunchball OAuth.
- Create a new custom setting or edit a current setting using the following values:
- Name - Any name you want to display for subsequent updates to this setting within Salesforce.
- OAuth Secret Key- The OAuth Secret Key from the Bunchball OAuth Client setup in step 1.
- OAuth Client Id - The OAuth Client Id from the Bunchball OAuth Client setup in step 1.

- Click Save.
Set Up the Bunchball User ID
The Bunchball ID must be set for every user. By default, the Bunchball ID is the user's current Salesforce Username. If you want to use a value other than the Salesforce username, do one of the following:
- To change the Bunchball ID for a specific user, navigate to Setup > Administer > Manage Users > Users. Click the Edit link for the user you are setting up. Then, in the user's profile, configure the Bunchball Id field.
- To change the default value of the Bunchball ID for all users, navigate to Setup > Build > Customize > Users > Fields. Click the Edit link for the Calculated ID, and edit the Calculated Id field by changing the parameter in the formula.
IF(
NOT(ISBLANK(Bunchball_Id__c)),
Bunchball_Id__c,
CHANGE-THIS-PARAMETER
Set Up URLs
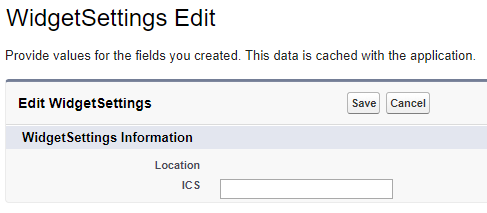
Update your configuration to point to a Nitro sandbox or ICS. Typically, you want to point to sandbox with your SFDC development or test instances. And change the URL for your production SFDC instance to point to production. This can be done in Salesforce Setup > Build > Develop > Custom Settings by creating a new WidgetSettings object and adding the ICS name to the ICS field. Example value: "p1"
After setting up your URLs, configure web components within Salesforce.

See also