Configure Nitro Web Components in Salesforce
Before configuring web components, you must complete all the configuration steps detailed here. Then, use the following sections to configure web components in Salesforce. After configuring web components, you can configure access to Visualforce pages via profile or permission sets.
Add Web Components to Your Dashboard
An initial Visualforce page is created based on the Bunchball template when you install the Bunchball package. This page will require some updates before using it in your environment. You can also clone the page to extend the web components onto different Salesforce pages.
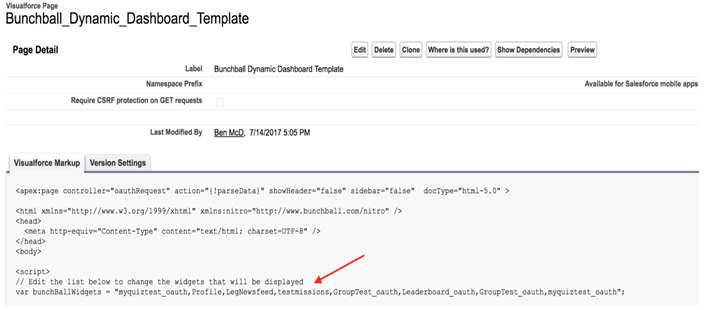
- Navigate to the Bunchball Dynamic Dashboard Template (Setup > Build > Develop > Visualforce Pages).
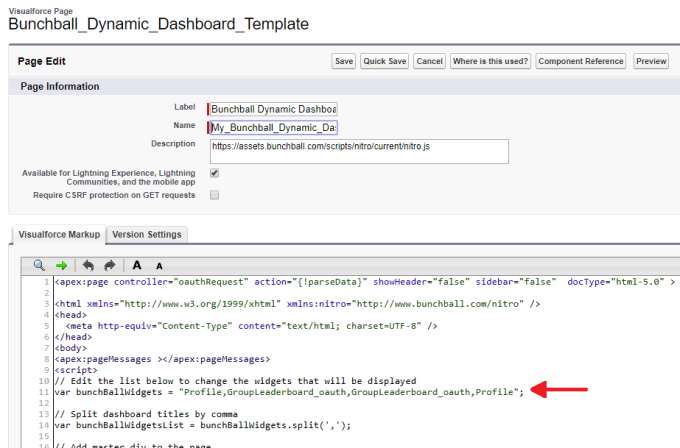
This page is already configured to show OAuth web components. The only information you need to input is the web components you want to see. - Click Edit and find the line that starts with var bunchBallWidgets =.
- Change the text within the parentheses to a comma separated list of the web components you want to appear on the page. Make sure to append '_oauth' to web components set up with OAuth. For example, 'profile_oauth,event_oauth'.
- Click Save.
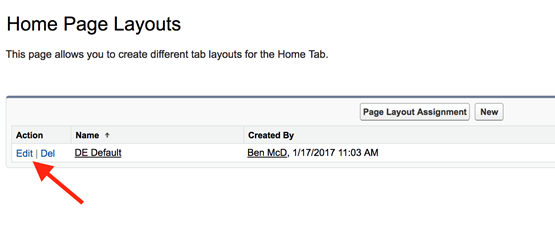
- Open Setup > Build > Customize > Home > Home Page Layouts.
These steps can also be used to add the Bunchball dashboard to other interior pages as needed. - Click Edit for the Home Page layout you want to update.
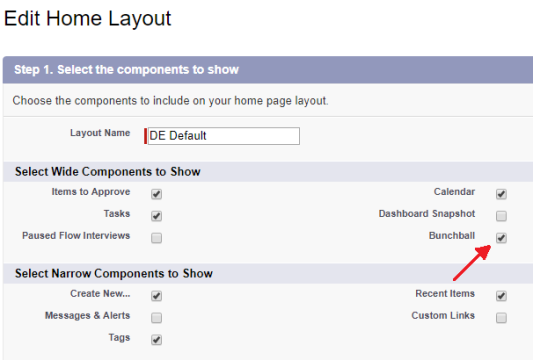
- Under Step 1. Select the components to show, verify the Bunchball option is selected.
- Click Next.
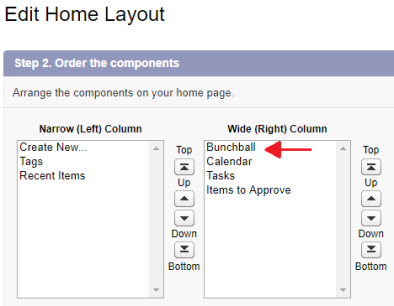
- Under Step 2. Order the components, make sure the Bunchball Dashboard is located in the Wide (Right) Column.
- Click Save.
The Bunchball Dashboard appears on your Home Page.
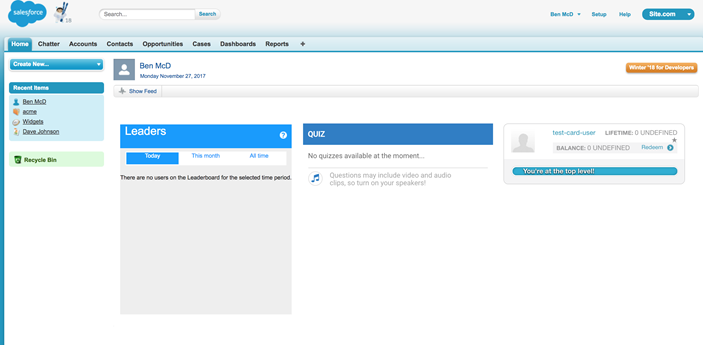
The following is an example of how the Visualforce page looks to the end user once configured.
Add Web Components to a Specific Page
This leverages the existing page already set up within separate areas of Salesforce.
- Open Setup > Build > Develop > Visualforce Pages.
- Click the Bunchball Dynamic Dashboard Template page and click the Clone button.
- Give the page a new name to differentiate it from the existing template page.
-
Change the text within the parentheses to a comma separated list of the web components you want to appear on the page. Make sure to append '_oauth' to web components set up with OAuth. For example, 'profile_oauth,event_oauth'.
- Click Save.
- Next, create a new Visualforce page against the page where you want it to reside. Open Setup > Build > Develop > Visualforce Pages.
- Click the New button and give the page a new name to differentiate it from the other pages.
- Copy and paste one of the following examples into the new page.
Example One:
<apex:page standardController="Opportunity">
<apex:include pageName="Bunchball_Dashboard_Dashboard_Template"/>
</apex:page>
Example Two:
<apex:page standardController="My_Custom_Object__c">
<apex:include pageName="Bunchball_Dashboard_Dashboard_Template"/>
</apex:page>-
Replace the value for the standardController with any other Salesforce object. Example: ”Opportunity”. If it's a custom object, you need to append "__c" to the Salesforce object name. Example: “myOpp__c”.
- Replace the pageName value with the Visualforce page created in steps 3-5.
- Configure access to the page.
Add the Bunchball Dynamic Dashboard to a Lightning Page
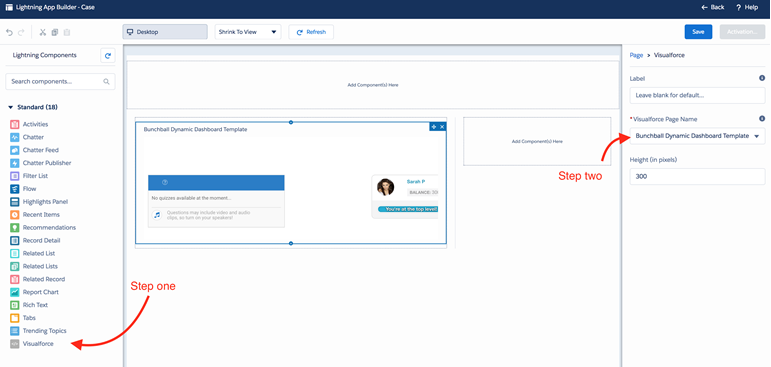
Adding a Bunchball Visualforce Web Component page to a Lightning page layout is very similar to adding any Visualforce page to a normal page layout. As you edit the layout, drag the Visualforce component onto the layout where you want it placed, and then select the Visualforce page on the right side.
Note: Verify the Available for Lightning Experience, Lightning Communities, and the mobile app check box is selected for any page you want to add to a Lightning Page.
See also