Create a New Report
You can immediately create a new one-time report or schedule a report to be delivered to you via email.
You can also programmatically access your reports, a report's details, and a report's download link via API. This allows you to return report information without downloading the report through Nitro Studio. The APIs will filter out links to reports that have expired.
- Open Nitro Studio > Analytics > Data Export > New.
Verify the data available date at the top right side of the Data Export view. Data after this date is not yet available and is not included in the reports. - Enter Basic settings:
- .csv - Comma separated text file.
- .tsv - Tab separated text file.
- Pipe Separated - Pipe separated text file.
- Actions - Returns a row of data for each action logged.
- Missions - Returns a row of data for each mission completed.
- Points - Returns a list of all point transactions.
- Users - Returns a list of all users in the system.
- Actions - Returns a count of the specified actions logged by users.
- Missions - Returns a count of the specified missions completed by users.
- Points - Returns a list of points awarded and redeemed.
- Users - Returns a list of users in the system.
- Click Next.
- Schedule your report:
- Report Frequency - Select when you want to receive the scheduled report.
- What time period do you want to report on - Select the time range to report on.
- Report on the last "x" day(s) (default) - Returns data from 12:01am to 11:59pm PST of the last "x" days up to the current day of running the report. For example, if you're running a report of the last 1 day of data on Tuesday, the report will return data from Monday.
- Report on the last 1 week(s) - Returns data from the previous Monday to Sunday as of the run date.
- Report on the last "x" week(s) - Returns data from the 7x-day period ending on the previous Saturday as of the run date.
- Report on the last 1 month(s) - Returns data from the previous calendar month.
- Report on the last "x" month(s) - Returns data from the multiple month range ending on the last day of previous month.
- Click Next.
- Select your report Contents.
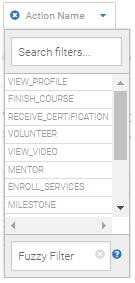
- Click the Add filter button and select a filter type from the drop-down list.
- Click the same filter button again and select one or more filters. Show me

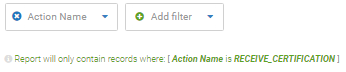
- Click away from the filter popup. The selected filter displays below the button. Show me
- If necessary, repeat the previous steps using additional Add filter buttons to add more filters.
- If necessary, click delete (
 ) to remove a filter.
 - In a missions report filtered by label, the label must be associated to the mission; not an action within the mission.
- In a points report filtered by label, the label must be associated to the mission that generated the points.
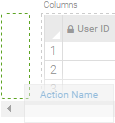
- Click and drag a column from the left pane.
- Drop the column onto the right pane add column (
 ). When the column is correctly positioned, the add button disappears and the area is highlighted. Show me
 - For User Preferences, enter the preference name in the column header. Case-sensitivity is ignored (additionalName and additionalname will return the same data).
- If no preference name is added, the column will be removed from the report.
- If the preference name is entered incorrectly (misspelled or doesn't exist), the column will be empty in the report.
- If necessary, click remove to delete a column from the report.
- Click Next.
- Click Add Email and enter one or more email addresses. You will receive the report download link in an email message from reporting@bunchball.com. The download link is active for 30 days.
Note: The report file is also available via API and in the Data Export view using the File Download link. - Click Save & Finish to run or queue the report for processing.
The report run time may vary greatly depending on the data being exported and the number and size of reports in the shared queue.
|
Field |
Description |
|---|---|
|
Name |
The unique report name.
|
|
File Type |
The type of file you want to receive: |
|
Description |
Additional information about the contents of your report. |
|
Provides every row of data for the selected report category. The available filters depend on the selected report category. For the selected time range: |
|
|
Provides sums, counts, and other metrics across data for the selected report category. The available filters depend on the selected report category. For the selected time range: |

|
Field |
Description |
|---|---|
|
One-Time Report |
Runs the report on the selected time range. The highlighted section of the calendar shows your selected dates. |
|
Runs the report on the selected frequency and relative time range. |
|
Field |
Description |
|---|---|
|
Filters |
Only data for the specified filter(s) is exported in the report. Metadata filters include both metadata and contextual tags. When filtering by group class, the group class must be a segment. Note: When filtering a missions or points report by label, the label must have a direct relationship with the mission to be included in the report. |
|
Columns |
Add the data fields you want to export in your report. Available columns depend on your report type. |
See also